环境安装
hadoop
ssh免密码登陆
- 在mac的系统偏好设置–>共享中打开远程登录
cat ~/.ssh/id_rsa.pub >> ~/.ssh/authorized_keysssh localhost
hadoop
1 | brew install hadoop |
Hadoop 伪分布式配置:
/opt/homebrew/Cellar/hadoop/3.3.4/libexec/etc/hadoop/core-site.xml配置如下信息:
1 | <configuration> |
/opt/homebrew/Cellar/hadoop/3.3.4/libexec/etc/hadoop/hdfs-site.xml配置信息如下:
1 | <configuration> |
- Env 配置
1 | export CLASSPAHT=.:$JAVA_HOME/lib/dt.jar:$JAVA_HOME/lib/tools.jar |
运行 hadoop 程序
初始化:hdfs namenode -format
start-dfs.sh1
2
3
4
5
6
7(base) ➜ ~ start-dfs.sh
Starting namenodes on [localhost]
localhost: WARNING: /opt/homebrew/Cellar/hadoop/3.3.4/libexec/logs does not exist. Creating.
Starting datanodes
Starting secondary namenodes [Y3Y54Q72DR]
Y3Y54Q72DR: ssh: Could not resolve hostname y3y54q72dr: nodename nor servname provided, or not known
2022-11-09 16:17:23,985 WARN util.NativeCodeLoader: Unable to load native-hadoop library for your platform... using builtin-java classes where applicable查看是否启动
jps1
2
3
4
5
6
7
8
9
10(base) ➜ ~ jps
86881
56226 Jps
22195
55683 NameNode
39907 NailgunRunner
55786 DataNode
43003 Launcher
23211 Application
30365查看 namenode, http://localhost:9870/dfshealth.html#tab-overview
修改
yarn配置文件。/opt/homebrew/Cellar/hadoop/3.3.4/libexec/etc/hadoop/mapred-site.xml添加内容:1
2
3
4
5
6
7
8
9<configuration>
<property>
<name>mapreduce.framework.name
</name>
<value>yarn</value>
</property>
</configuration>修改
/opt/homebrew/Cellar/hadoop/3.3.4/libexec/etc/hadoop/yarn-site.xml1
2
3
4
5
6
7
8
9
10
11
12<configuration>
<property>
<name>yarn.nodemanager.aux-services</name>
<value>mapreduce_shuffle</value>
</property>
<property>
<name>yarn.nodemanager.env-whitelist</name>
<value>JAVA_HOME,HADOOP_COMMON_HOME,HADOOP_HDFS_HOME,HADOOP_CONF_DIR,CLASSPATH_PREPEND_DISTCACHE,HADOOP_YARN_HOME,HADOOP_MAPRED_HOME</value>
</property>
</configuration>启动
yarn,start-yarn.sh1
2
3(base) ➜ hadoop git:(stable) start-yarn.sh
Starting resourcemanager
Starting nodemanagers运行 Hadoop 自带的 wordcount 程序
hadoop fs -mkdir /input创建文件夹hadoop fs -ls /查看文件夹
1
2
3
4
5
6(base) ➜ hadoop git:(stable) hadoop fs -mkdir /input
2022-11-09 16:27:09,642 WARN util.NativeCodeLoader: Unable to load native-hadoop library for your platform... using builtin-java classes where applicable
(base) ➜ hadoop git:(stable) hadoop fs -ls /
2022-11-09 16:27:30,749 WARN util.NativeCodeLoader: Unable to load native-hadoop library for your platform... using builtin-java classes where applicable
Found 1 items
drwxr-xr-x - bytedance supergroup 0 2022-11-09 16:27 /input运行程序
hadoop jar /opt/homebrew/Cellar/hadoop/3.3.4/libexec/share/hadoop/mapreduce/hadoop-mapreduce-examples-3.3.4.jar wordcount /input /output
Hive
太麻烦了(
1 | export HIVE_HOME=/usr/local/hive |
1 | HADOOP_HOME=/opt/homebrew/Cellar/hadoop/3.3.4/libexec |
hive-site.xml
1 | <configuration> |
spark
安装
scala,必须安装 spark 指定的版本,不然 spark 会报错下载
spark,spark官网安装 配置
spark1
2
3sudo tar -zxf ~/下载/spark-2.1.0-bin-without-hadoop.tgz -C /usr/local/cd /usr/local
sudo mv ./spark-2.1.0-bin-without-hadoop/ ./spark
sudo chown -R hadoop:hadoop ./spark # 此处的 hadoop 为你的用户名安装后,还需要修改Spark的配置文件spark-env.sh
1
2cd $SPARK_HOME
cp ./conf/spark-env.sh.template ./conf/spark-env.sh编辑spark-env.sh文件(vim ./conf/spark-env.sh),在第一行添加以下配置信息:
1
export SPARK_DIST_CLASSPATH=$(/opt/homebrew/bin/hadoop classpath)
有了上面的配置信息以后,Spark就可以把数据存储到Hadoop分布式文件系统HDFS中,也可以从HDFS中读取数据。如果没有配置上面信息,Spark就只能读写本地数据,无法读写HDFS数据。
验证安装
1
2
3
4bin/run-example SparkPi 2>&1 | grep "Pi is"
(base) ➜ spark-3.3.1-bin-hadoop3 git:(stable) bin/run-example SparkPi 2>&1 | grep "Pi is"
Pi is roughly 3.1459757298786495启动 spark
localhost: namenode running as process 2896. Stop it first.
不要启动到
hadoop的start_all.sh了😇1
2
3
4
5
6
7
8
9
10
11
12
13
14
15
16(base) ➜ ~ cd $SPARK_HOME/sbin
(base) ➜ sbin git:(stable) ./start-all.sh
starting org.apache.spark.deploy.master.Master, logging to /opt/homebrew/Cellar/spark-3.3.1-bin-hadoop3/logs/spark-bytedance-org.apache.spark.deploy.master.Master-1-Y3Y54Q72DR.out
localhost: starting org.apache.spark.deploy.worker.Worker, logging to /opt/homebrew/Cellar/spark-3.3.1-bin-hadoop3/logs/spark-bytedance-org.apache.spark.deploy.worker.Worker-1-Y3Y54Q72DR.out
(base) ➜ sbin git:(stable) jps
86881
67523 Master
22195
67634 Worker
67669 Jps
66823 NameNode
43003 Launcher
23211 Application
67197 ResourceManager
30365
66927 DataNode启动
spark shell1
2
3
4
5
6
7
8
9spark-shell --master <master-url>
* local 使用一个Worker线程本地化运行SPARK(完全不并行)
* local[*] 使用逻辑CPU个数数量的线程来本地化运行Spark
* local[K] 使用K个Worker线程本地化运行Spark(理想情况下,K应该根据运行机器的CPU核数设定)
* spark://HOST:PORT 连接到指定的Spark standalone master。默认端口是7077.
* yarn-client 以客户端模式连接YARN集群。集群的位置可以在HADOOP_CONF_DIR 环境变量中找到。
* yarn-cluster 以集群模式连接YARN集群。集群的位置可以在HADOOP_CONF_DIR 环境变量中找到。
* mesos://HOST:PORT 连接到指定的Mesos集群。默认接口是5050。1
2cd $SPARK_HOME/bin
./spark-shell --master local1
2
3
4
5
6
7
8
9
10
11
12Welcome to
____ __
/ __/__ ___ _____/ /__
_\ \/ _ \/ _ `/ __/ '_/
/___/ .__/\_,_/_/ /_/\_\ version 3.3.1
/_/
Using Scala version 2.12.15 (OpenJDK 64-Bit Server VM, Java 1.8.0_292)
Type in expressions to have them evaluated.
Type :help for more information.
Spark 独立应用程序编程
遇到的坑
路径问题:
spark 应该会从 hdfs 上面查找文件。如果需要查找本地文件的话,需要使用
file:开头,例如:1
val logFile = "file:/Users/bytedance/resource/fyy/log.log"
找不到 class 的问题:
首先包含
main方法的类名要和--class输入的类名保持一致。使用 idea 会报错,不知道为什么。之后还是用 vscode 吧😇
如下:
1
2
3
4SLF4J: Actual binding is of type [org.apache.logging.slf4j.Log4jLoggerFactory]
Error: Failed to load class SimpleApp.
22/11/10 11:22:42 INFO ShutdownHookManager: Shutdown hook called
22/11/10 11:22:42 INFO ShutdownHookManager: Deleting directory /private/var/folders/b1/0fd1b6hs7lz0fm_mh346lybm0000gn/T/spark-533682ae-17f9-4229-a3d0-a621fe441511
1
2
3
4
5
6
7
8
9
10
11
12
13import org.apache.spark.sql.SparkSession
object SimpleApp {
def main(args: Array[String]) {
val logFile = "file:/Users/bytedance/resource/fyy/log.log" // Should be some file on your system
val spark = SparkSession.builder.appName("Simple Application").getOrCreate()
val logData = spark.read.textFile(logFile).cache()
val numAs = logData.filter(line => line.contains("a")).count()
val numBs = logData.filter(line => line.contains("b")).count()
println(s"Lines with a: $numAs, Lines with b: $numBs")
spark.stop()
}
}1
2
3
4
5
6
7name := "Simple App"
version := "1.0"
scalaVersion := "2.13.10"
libraryDependencies += "org.apache.spark" %% "spark-sql" % "3.3.1"
两种 sparkcontext 姿势
1 | import org.apache.spark.SparkContext |
1 | import org.apache.spark.sql.SparkSession |
输出:
1 | (base) ➜ sparkapp $SPARK_HOME/bin/spark-submit \ |
wordCount
一些常用的函数
文件读写:
- 读写本地文件
1 | // 读取文件 如果是本地文件 必须用 file:// 开头,用于区分 hdfs |
- 读写 hdfs 文件
hdfs 常用命令:
1 | hdfs dfs -mkdir hdfspath |
spark 读取 hdfs 路径:
1 | val textFile = sc.textFile("hdfs://localhost:8020/user/spark/word.txt") |
词频统计:
1 | textFile.flatMap(line => line.split(" ")).map(word => (word, 1)).reduceByKey((a, b) => a + b).foreach(println) |
配置 vscode scala spark 环境
vscode 配置 scalafmt (寄了,建议用 idea)
在 project 中添加 plugins.sbt 文件
1 | // In project/plugins.sbt. Note, does not support sbt 0.13, only sbt 1.x. |
添加 .scalafmt.config 文件
1 | version = 2.7.5 |
Spark 运行流程

- Spark 应用程序被提交,任务控制节点(Driver)创建一个 SparkContext。SparkContext会向资源管理器(Cluster Manager)注册并申请运行Executor的资源。
- Cluster Manager 为 Executor 分配资源,启动 executor 进程,executor运行情况将随着“心跳”发送到资源管理器上。
- RDD -> DAG -> task set(stage) -> executor
- 任务在Executor上运行,把执行结果反馈给任务调度器,然后反馈给DAG调度器,运行完毕后写入数据并释放所有资源。
一个任务创建在一个 worker 上面创建一个 exector
RDD
一个RDD就是一个分布式对象集合,本质上是一个只读的分区记录集合,每个RDD可以分成多个分区,每个分区就是一个数据集片段,并且一个RDD的不同分区可以被保存到集群中不同的节点上,从而可以在集群中的不同节点上进行并行计算。
容错:通过 RDD 的 DAG 实现容错
中间结果持久化到内存
存放数据可以是 Java obj
Narrow:一对一,多对一
Wild:一对多
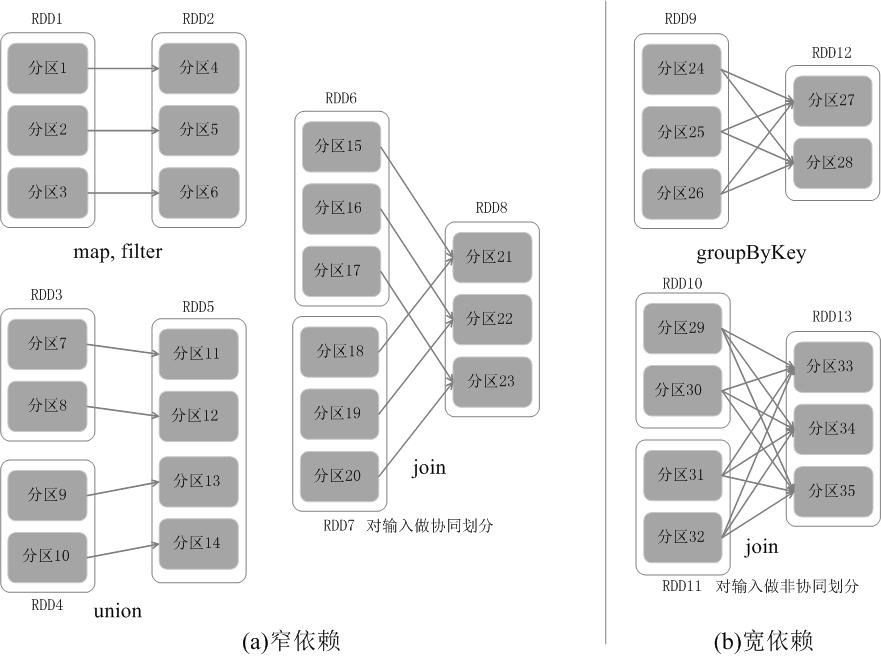
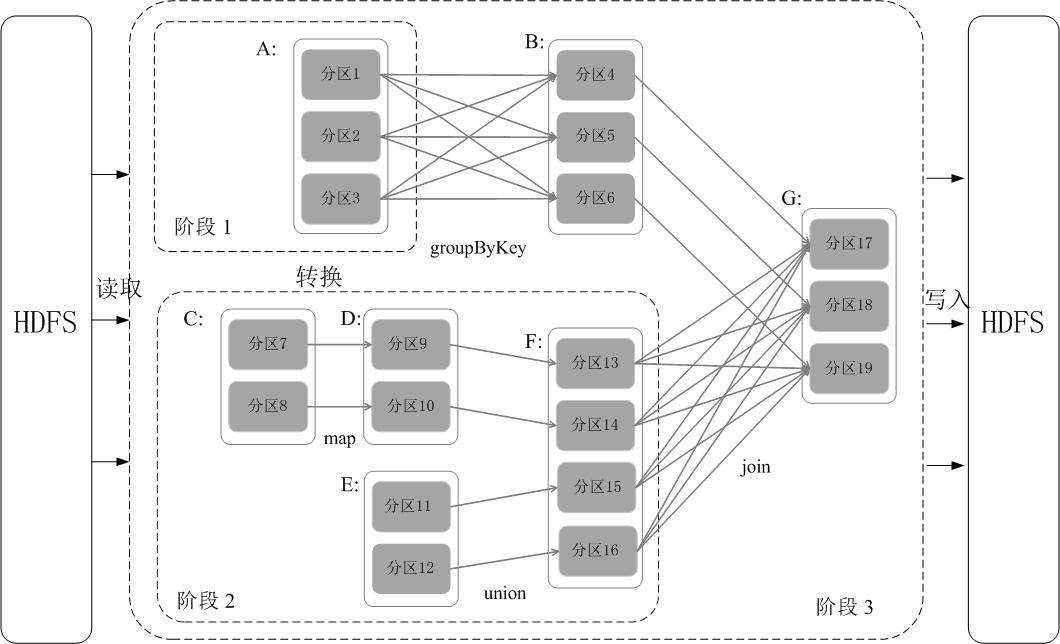
阶段划分
在DAG中进行反向解析,遇到宽依赖就断开,遇到窄依赖就把当前的RDD加入到当前的阶段中;将窄依赖尽量划分在同一个阶段中,可以实现流水线计算。
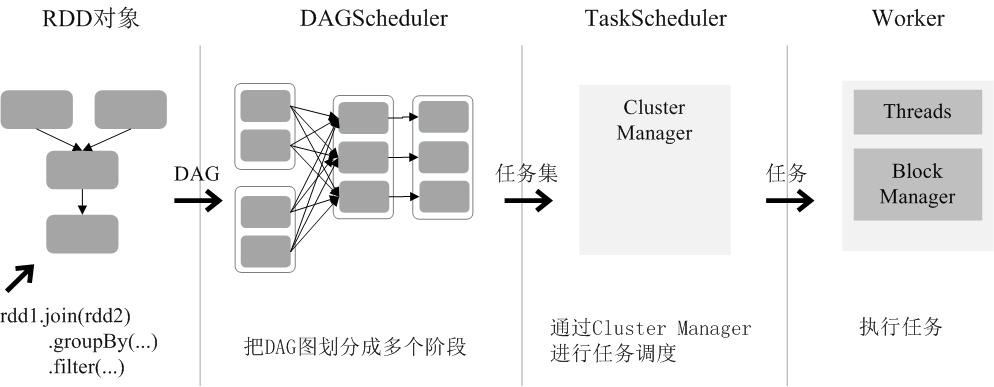
运行过程
- 创建 RDD,sparkContext 解析依赖关系,生成 DAG
- DAGScheduler 将 DAG 拆成多个 stage。
- 每个阶段中包含了多个任务,每个任务会被任务调度器分发给各个工作节点(Worker Node)上的Executor去执行。
RDD创建
读取外部数据集,HDFS,LOCAL,Kafka
如果使用了本地文件系统的路径,那么,必须要保证在所有的worker节点上,也都能够采用相同的路径访问到该文件,比如,可以把该文件拷贝到每个worker节点上,或者也可以使用网络挂载共享文件系统。
1
2
3val lines = sc.textFile("file:///usr/local/spark/mycode/rdd/word.txt")
val lines = sc.textFile("hdfs://localhost:9000/user/hadoop/word.txt")调用 SparkContext 的 parallelize 方法,在已有的集合上面创建一个 RDD
1
2
3
4val list = (1 to 10).toList
val array = (1 to 10).toArray
val rdd = sc.parallelize(list)
val rdd = sc.parallelize(array)
RDD操作
RDD 创建之后,在后续过程中一般只会发生两种操作:
- transformation:RDD => newRDD
- Action: 在数据集上运算,返回结果
transformation
- filter(func)
- map(func)
- flatMap(func)
- groupByKey()
- reduceByKey(func)
action
- count()
- collect() 以数组的形式返回数据集中的所有元素
- first()
- take(n)
- reduce(func)
- foreach(func)
RDD持久化
RDD采用惰性求值的机制,每次遇到行动操作,都会从头开始执行计算。
在一些情形下,我们需要多次调用不同的行动操作,这就意味着,每次调用行动操作,都会触发一次从头开始的计算。
通过持久化机制避免这种重复计算的开销。可以使用persist()方法对一个RDD标记为持久化,之所以说“标记为持久化”,是因为出现persist()语句的地方,并不会马上计算生成RDD并把它持久化,而是要等到遇到第一个行动操作触发真正计算以后,才会把计算结果进行持久化,持久化后的RDD将会被保留在计算节点的内存中被后面的行动操作重复使用。
1 | scala> val mp = textFile.map(line => line.split(" ").size) |
如果使用集群模式打印 RDD 的话,不能使用 rdd.foreach(println) 或者rdd.map(println),而是 rdd.collect().foreach(println) 或者rdd.collect().toke(100).foreach(println)
键值对 RDD
通过 map 函数创建 kvRDD
1 | val pairRDD = lines.flatMap(line => line.split(" ")).map(word => (word,1)) |
transformation:
reduceByKey
groupByKey
sortByKey
mapValues(func): 作用于 (k, v) 的 value 的函数
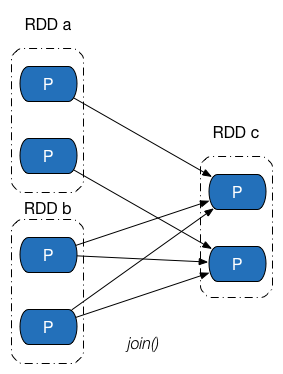
join: (k, v1), (k, v2) => (k, (v1, v2))
keys
values
demo:统计 kv 的平均值
1 | val rdd = sc.parallelize(Array(("spark",2),("hadoop",6),("hadoop",4),("spark",6))) |
API
Transformations => another RDD
- map, filter, union
- groupByKey, reduceByKey, repartition
Actions => Lineage 中断
- count, collect, saveAsTextFile
- foreach
parallelize
Source
from storage
HDFS
words = sc.textFile("hdfs://...")local:
Kafka
from another RDD
1
res = words.map(word => (word, 1)).reduceByKey((a, b) => a + b)
提交作业:
spark-shellSpark-submitnarrow(pipeline): e.g. map
wide(shuffle): e.g. reduceByKey
共享变量
当Spark在集群的多个不同节点的多个任务上并行运行一个函数时,它会把函数中涉及到的每个变量,在每个任务上都生成一个副本。
问题:有时候,需要在多个任务之间共享变量。
解决:引入 广播变量,累加器
广播变量
序列化是 Java对象 => 字节序列 的过程。
反序列化是 字节序列 => Java对象 的过程。
主要用于两个 java 进程进行通信,传输 java 对象传送。
好处:
- 数据持久化
- 序列化实现远程通信
在每个机器上缓存一个只读的变量,而不是为机器上的每个任务都生成一个副本。
显式创建广播变量的场景:当跨越多个阶段的那些任务需要相同的数据。
1 | val broadcastVar = sc.broadcast(Array(1, 2, 3)) |
SparkContext.broadcast(v) 之后,集群的函数都需要使用 广播变量 的值,而不是原值。
累加器
一个数值型的累加器,可以通过调用SparkContext.longAccumulator()或者SparkContext.doubleAccumulator()来创建。
1 | val accum = sc.longAccumulator("My Accumulator") |
Spark SQL
DataFrame 和 RDD 的区别:
- RDD 是分布式 Java 对象集合,对象内部结构对于 RDD 不可知。
- DataFrame 是以 RDD 为基础的分布式数据集(分布式 Row 对象集合),提供详细的结构信息
同时:
DataFrame 也采用惰性机制,和 RDD 的处理逻辑一样。
DF 创建 & 保存
创建
- 读取文件
1 | val peopleDF = spark.read.format("json").load("file:///people.json") |
- 使用 rdd 创建 df
1 | val filename = "hdfs://localhost:8020/user/spark/people.txt" |
- 读取 rdd => rowRDD
- 创建 schema
- 创建 df
保存
1 | peopleDF.select("name", "age").write.format("csv").save("file:///newpeople.csv") |
write.format()支持输出 json,parquet, jdbc, orc, libsvm, csv, text等格式文件,如果要输出文本文件,可以采用write.format(“text”),但是,需要注意,只有select()中只存在一个列时,才允许保存成文本文件,如果存在两个列,比如select(“name”, “age”),就不能保存成文本文件。
获取 mysql 数据
shell & 程序方法使用 JDBC 读取 mysql 数据
安装 JDBC
启动 shell 的时候指定 jdbc
1
2
3spark-shell \
--jars $SPARK_HOME/jars/mysql-connector-j-8.0.31/mysql-connector-j-8.0.31.jar \
--driver-class-path $SPARK_HOME/jars/mysql-connector-j-8.0.31/mysql-connector-j-8.0.31.jar获取 mysql 数据
1
2
3
4
5
6
7
8
9
10scala> val jdbcDF = spark.read.format("jdbc").option("url", "jdbc:mysql://localhost:3306/spark").option("driver","com.mysql.jdbc.Driver").option("dbtable", "student").option("user", "root").option("password", "123").load()
jdbcDF: org.apache.spark.sql.DataFrame = [id: int, name: string ... 2 more fields]
scala> jdbcDF.show()
+---+--------+------+---+
| id| name|gender|age|
+---+--------+------+---+
| 1| Xueqian| F| 23|
| 2|Weiliang| M| 24|
+---+--------+------+---+
Spark Streaming
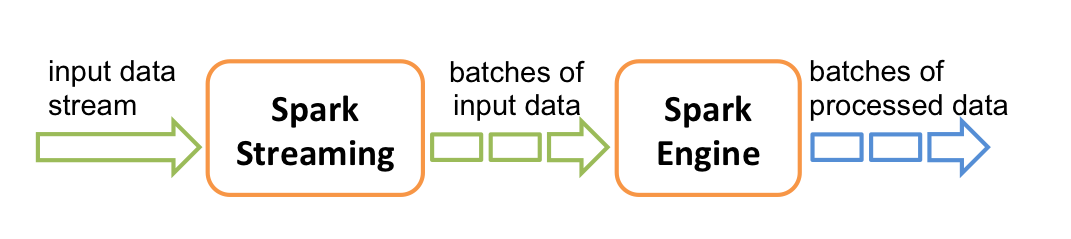
将输入流按照时间片进行拆分(秒级),然后进过 spark 引擎批处理。
DStream(Discretized Stream,离散化数据流),表示连续不断的数据流。
数据分区器 rdd如何存储
Spark 源码阅读
RDD
- partitions 列表
- dependencies 列表
- 一些函数,e.g. map
RDD 分区
分区接口定义,实现 Serializable 可以实现序列化操作。
1 | trait Partition extends Serializable { |
RDD:
- 包含一个
partitions的 list,外界只能通过partitions方法来访问,子类需要重写getPartitions方法
1 | private var partitions_ : Array[Partition] = null |
RDD 分区个数分配原则
尽可能使得分区的个数,等于集群核心数目。
转换操作得到的 RDD 的分区个数:
- narrow:子 RDD 由父 RDD 分区个数决定
- Shuffle:依赖由子 RDD 分区器决定
parallelize 方法,通过 defaultParallelism 参数来决定分区大小。
1 | def parallelize[T: ClassTag]( |
defaultParallelism 参数由 spark 不同的模式来确定,例如 SingleCoreMockBackend 只有一个 core
1 | private[spark] class SingleCoreMockBackend( |
textFile 方法,最小是 2
1 | def textFile( |
1 | def defaultMinPartitions: Int = math.min(defaultParallelism, 2) |
RDD 分区内记录个数
尽可能使同一 RDD 不同分区内的记录的数量一致。
- narrow:依赖于父 RDD 中相同编号分区是如何进行数据分配的
- shuffle:依赖于选择的分区器,哈希分区器无法保证数据被平均分配到各个分区,而范围分区器则能做到这一点。
1 | private object ParallelCollectionRDD { |
就是构造等长的分区。
RDD 依赖
在外部通常把记录的信息成为血缘关系。在内部记录则是 RDD 之间的依赖 Dependancy。
依赖只保存在父 RDD 中。
1 |
|
依赖的分类
依赖关系指两个 RDD 之间的依赖关系。如果一次转换中包含多个父依赖,则可能同时存在 narrow 和 wild
narrow
Narrow 实现在 NarrowDependency 中。
1 |
|
narrow 可以进一步分为 一对一依赖 和 范围依赖
一对一依赖
一对一依赖表示子 RDD 分区的编号与父 RDD 分区的编号完全一致的情况。
1 |
|
范围依赖
范围依赖是子 RDD 有父 RDD,但是分区信息还是一对一的。如图:
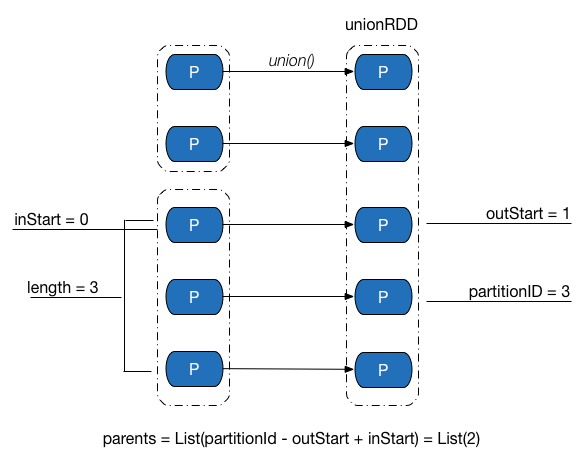
1 | /** |
shuffle
1 | /** |
RDD 持久化
Spark 速度非常快的原因之一,就是在不同操作中可以在内存中持久化或缓存个数据集。
缓存是 Spark 构建 迭代式算法 和 快速交互式查询 的关键。
如果一个有持久化数据的节点发生故障,Spark 会在需要用到缓存的数据时重算丢失的数据分区。如果希望节点故障的情况不会拖累我们的执行速度,也可以把数据备份到多个节点上。
两种持久化操作:
- persist(StorageLevel)
- cache, cache 就相当于 MEMORY_ONLY 的 persist
RDD 缓存方式
[[内存管理]] 可以查看 on-heap 和 off-heap 内存的优缺点。
默认情况下 persist() 会把数据以序列化的形式缓存在 JVM 的堆空间中。
这两个方法并不是被调用时立即缓存,而是触发后面的 action 时,该 RDD 将会被缓存在计算节点的内存中,并供后面重用。
在存储级别的末尾加上 _2 来把持久化数据存为两份。例如 DISK_ONLY_2

1 | object StorageLevel { |
persist, cache, unpersist
persist and cache
1 | // cache() 等同于 persist() 等同于 persist(StorageLevel.MEMORY_ONLY) ,也就是仅缓存于存储内存中。 |
unpersist
1 | def unpersist(blocking: Boolean = false): this.type = { |
获取 persistent RDD 的方法:
1 | scala> val rdds = sc.getPersistentRDDs |
iterator
iterator 是真正触发存储的地方
iterator1
2
3
4
5
6
7
8
9final def iterator(split: Partition, context: TaskContext): Iterator[T] = {
if (storageLevel != StorageLevel.NONE) {
// 如果存储等级存在的话,调用
getOrCompute(split, context)
} else {
// compute or 读取 checkpoint
computeOrReadCheckpoint(split, context)
}
}getOrComput- 通过 cache 或者 checkpoint 读取数据
- 否则 comput,然后存储
1
2
3
4
5
6
7
8
9
10
11
12
13
14
15
16
17
18
19
20
21
22
23
24
25
26
27
28
29
30
31
32
33
34private[spark] def getOrCompute(partition: Partition, context: TaskContext): Iterator[T] = {
val blockId = RDDBlockId(id, partition.index)
var readCachedBlock = true
SparkEnv.get.blockManager.getOrElseUpdate(blockId, storageLevel, elementClassTag, () => {
// 定义了如果 rdd 没有存储,计算的过程
readCachedBlock = false
computeOrReadCheckpoint(partition, context)
}) match {
// Block hit. 通过 comput 或者 存储 获取到数据
case Left(blockResult) =>
...
// Need to compute the block. 只有不够存储的时候才会出发这个 comput
case Right(iter) =>
new InterruptibleIterator(context, iter)
}
}
private[spark] def computeOrReadCheckpoint(split: Partition, context: TaskContext): Iterator[T] =
{
if (isCheckpointedAndMaterialized) {
// 如果有 checkpoint,TODO
firstParent[T].iterator(split, context)
} else {
// 否则计算
compute(split, context)
}
}
/***
* :: DeveloperApi ::
* Implemented by subclasses to compute a given partition.
*/
def compute(split: Partition, context: TaskContext): Iterator[T]getOrElseUpdate- 命中,读取 storage
- 不命中,comput and storage
1
2
3
4
5
6
7
8
9
10
11
12
13
14
15
16
17
18
19
20
21
22
23
24
25def getOrElseUpdate[T](
blockId: BlockId,
level: StorageLevel,
classTag: ClassTag[T],
makeIterator: () => Iterator[T]): Either[BlockResult, Iterator[T]] = {
// hit local or remote storage, retrun ans
get[T](blockId)(classTag) match {
case Some(block) =>
return Left(block)
case _ =>
// Need to compute the block.
}
// Initially we hold no locks on this block.
doPutIterator(blockId, makeIterator, level, classTag, keepReadLock = true) match {
case None =>
// SUCCESS the block already existed or was successfully stored
Left(blockResult)
case Some(iter) =>
// FAILED
// The put failed, likely because the data was too large to fit in memory and could not be
// dropped to disk. Therefore, we need to pass the input iterator back to the caller so
// that they can decide what to do with the values (e.g. process them without caching).
Right(iter)
}
}doPutIterator- 优先使用 memory
- 可以序列化
memoryStore.putIteratorAsBytes - 不能序列化
memoryStore.putIteratorAsValues - 使用 disk
diskStore.put
- 可以序列化
- 使用 disk
diskStore.put
1
2
3
4
5
6
7
8
9
10
11
12
13
14
15
16
17
18
19
20
21
22
23
24
25
26
27
28
29
30
31
32
33
34
35
36
37
38
39
40
41
42
43
44
45
46
47
48
49
50
51
52
53
54
55
56
57
58
59
60
61
62
63
64
65
66
67private def doPutIterator[T](
blockId: BlockId,
iterator: () => Iterator[T],
level: StorageLevel,
classTag: ClassTag[T],
tellMaster: Boolean = true,
keepReadLock: Boolean = false): Option[PartiallyUnrolledIterator[T]] = {
doPut(blockId, level, classTag, tellMaster = tellMaster, keepReadLock = keepReadLock) { info =>
val startTimeNs = System.nanoTime()
var iteratorFromFailedMemoryStorePut: Option[PartiallyUnrolledIterator[T]] = None
// Size of the block in bytes
var size = 0L
if (level.useMemory) {
// 优先使用内存
// Put it in memory first, even if it also has useDisk set to true;
// We will drop it to disk later if the memory store can't hold it.
if (level.deserialized) {
// 不能序列化,iterator() 需要启动 executor 先进行计算,得到 res,存储
memoryStore.putIteratorAsValues(blockId, iterator(), level.memoryMode, classTag) match {
case Right(s) =>
size = s
case Left(iter) =>
// Not enough space to unroll this block; drop to disk if applicable
if (level.useDisk) {
// 使用 disk 存储
diskStore.put(blockId) { channel =>
val out = Channels.newOutputStream(channel)
serializerManager.dataSerializeStream(blockId, out, iter)(classTag)
}
size = diskStore.getSize(blockId)
} else {
iteratorFromFailedMemoryStorePut = Some(iter)
}
}
} else { // !level.deserialized
// 可以序列化,iterator() 需要启动 executor 先进行计算,得到 res,存储
memoryStore.putIteratorAsBytes(blockId, iterator(), classTag, level.memoryMode) match {
case Right(s) =>
size = s
case Left(partiallySerializedValues) =>
// Not enough space to unroll this block; drop to disk if applicable
if (level.useDisk) {
// 使用 disk
logWarning(s"Persisting block $blockId to disk instead.")
diskStore.put(blockId) { channel =>
val out = Channels.newOutputStream(channel)
partiallySerializedValues.finishWritingToStream(out)
}
size = diskStore.getSize(blockId)
} else {
iteratorFromFailedMemoryStorePut = Some(partiallySerializedValues.valuesIterator)
}
}
}
} else if (level.useDisk) {
// 使用 disk
diskStore.put(blockId) { channel =>
val out = Channels.newOutputStream(channel)
serializerManager.dataSerializeStream(blockId, out, iterator())(classTag)
}
size = diskStore.getSize(blockId)
}
}
}- 优先使用 memory
memory 底层存储的本质是调用
putIterator1
2
3
4
5
6
7
8
9
10
11
12
13
14
15
16
17
18
19
20
21
22
23
24
25
26
27
28
29
30
31
32
33
34
35
36
37
38
39
40
41
42
43
44
45
46
47
48
49
50
51
52
53
54
55
56
57
58
59
60
61
62
63
64
65
66
67
68
69
70
71
72
73
74
75
76private def putIterator[T](
blockId: BlockId,
values: Iterator[T],
classTag: ClassTag[T],
memoryMode: MemoryMode,
valuesHolder: ValuesHolder[T]): Either[Long, Long] = {
require(!contains(blockId), s"Block $blockId is already present in the MemoryStore")
// Number of elements unrolled so far | 当前需要存储的 elem 数量
var elementsUnrolled = 0
// Whether there is still enough memory for us to continue unrolling this block | 是否需要继续 rolling
var keepUnrolling = true
// Initial per-task memory to request for unrolling blocks (bytes). | 初始化申请 memo 的大小 default 1M
val initialMemoryThreshold = unrollMemoryThreshold
// How often to check whether we need to request more memory | unrolling 多少个 elem 进行一次 memo 大小检查 default 16
val memoryCheckPeriod = conf.get(UNROLL_MEMORY_CHECK_PERIOD)
// Memory currently reserved by this task for this particular unrolling operation | 当前占用 memo 的大小
var memoryThreshold = initialMemoryThreshold
// Memory to request as a multiple of current vector size | vector 扩容的 frac default 1.5
val memoryGrowthFactor = conf.get(UNROLL_MEMORY_GROWTH_FACTOR)
// Keep track of unroll memory used by this particular block / putIterator() operation
var unrollMemoryUsedByThisBlock = 0L
// Request enough memory to begin unrolling | 申请初始化 memo
keepUnrolling =
reserveUnrollMemoryForThisTask(blockId, initialMemoryThreshold, memoryMode)
if (!keepUnrolling) {
logWarning(s"Failed to reserve initial memory threshold of " +
s"${Utils.bytesToString(initialMemoryThreshold)} for computing block $blockId in memory.")
} else {
unrollMemoryUsedByThisBlock += initialMemoryThreshold
}
// Unroll this block safely, checking whether we have exceeded our threshold periodically
while (values.hasNext && keepUnrolling) {
// 将当前元素加入 vector
valuesHolder.storeValue(values.next())
// 如果到了一个 period,则进行一个 memo 容量检查
if (elementsUnrolled % memoryCheckPeriod == 0) {
// 估算当前 vector 的存储容量
val currentSize = valuesHolder.estimatedSize()
// If our vector's size has exceeded the threshold, request more memory | 超过容量需要 memo 扩容
if (currentSize >= memoryThreshold) {
val amountToRequest = (currentSize * memoryGrowthFactor - memoryThreshold).toLong
keepUnrolling =
reserveUnrollMemoryForThisTask(blockId, amountToRequest, memoryMode)
if (keepUnrolling) {
unrollMemoryUsedByThisBlock += amountToRequest
}
// New threshold is currentSize * memoryGrowthFactor
memoryThreshold += amountToRequest
}
}
elementsUnrolled += 1
}
// Make sure that we have enough memory to store the block. By this point, it is possible that
// the block's actual memory usage has exceeded the unroll memory by a small amount, so we
// perform one final call to attempt to allocate additional memory if necessary.
if (keepUnrolling) {
val entry = entryBuilder.build()
// Synchronize so that transfer is atomic | 进行一个 memo 的存储
entries.synchronized {
entries.put(blockId, entry)
}
logInfo("Block %s stored as values in memory (estimated size %s, free %s)".format(blockId,
Utils.bytesToString(entry.size), Utils.bytesToString(maxMemory - blocksMemoryUsed)))
Right(entry.size)
} else {
// We ran out of space while unrolling the values for this block
logUnrollFailureMessage(blockId, valuesHolder.estimatedSize())
Left(unrollMemoryUsedByThisBlock)
}
}
checkpoint
cache 和 persist 将数据持久化到 memory 或者 disk,而且保存了血缘关系。如果出现 node crash 的情况还是可以重新计算的。
chechpoint 是直接将数据持久化到 hdfs 中,因为 hdfs 的高可靠性,所以所以阶段之前的血缘关系。
checkpoint saves the RDD to an HDFS file and actually forgets the lineage completely. This is allows long lineages to be truncated and the data to be saved reliably in HDFS
1 | // 设置 checkpoint 的保存路径 |
环境搭建
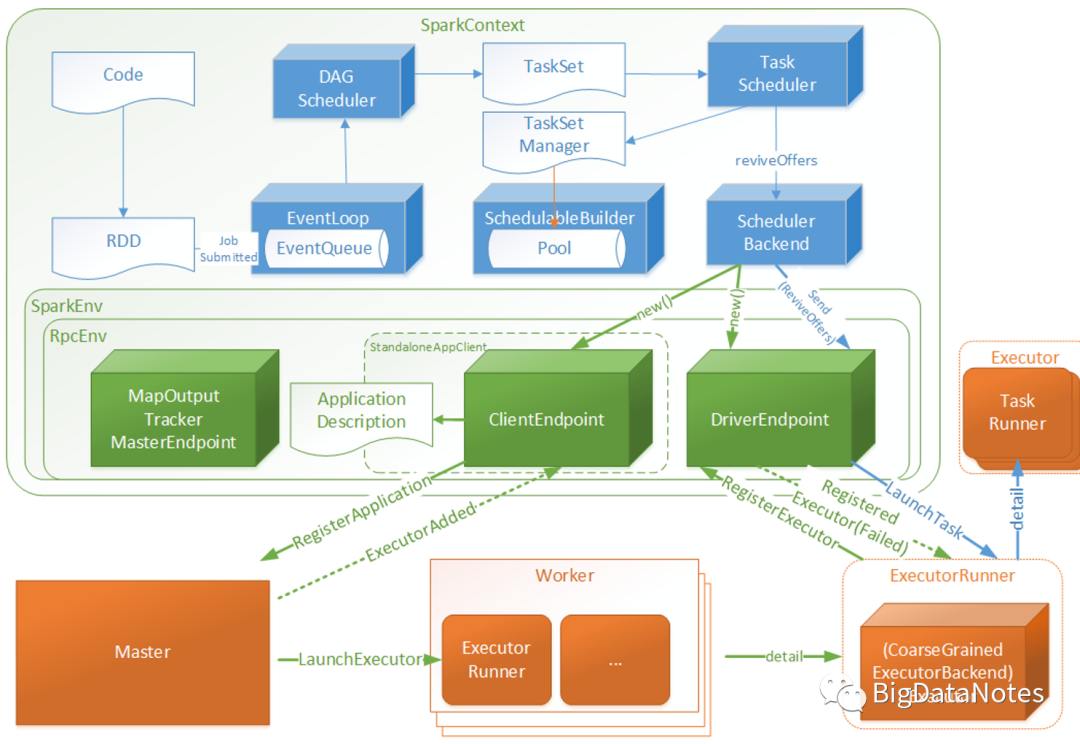
分析 spark-shubmit 的执行流程:
1 | SPARK_HOME/bin/spark-submit \ |
调用 spark-submit 脚本会执行
java org.apache.deploy.SparkSubmit对象。创建 SparkSubmit 对象调用 doSubmit 方法
解析命令行参数,默认
action为SUBMIT,action = Option(action).getOrElse(SUBMIT)调用 submit 方法,=> 调用 runMain 方法。
runMain 方法
解析命令行参数 => master == ‘local’ => LOCAL
获取 childMainClass
1
2
3
4
5
6private[deploy] val YARN_CLUSTER_SUBMIT_CLASS =
"org.apache.spark.deploy.yarn.YarnClusterApplication"
private[deploy] val REST_CLUSTER_SUBMIT_CLASS = classOf[RestSubmissionClientApp].getName()
private[deploy] val STANDALONE_CLUSTER_SUBMIT_CLASS = classOf[ClientApp].getName()
private[deploy] val KUBERNETES_CLUSTER_SUBMIT_CLASS =
"org.apache.spark.deploy.k8s.submit.KubernetesClientApplication"通过 mainClass 反射创建 app,(反射:通过 classname 动态加载和构造对象),并调用 start 方法,开始运行用户的代码
1
2
3
4
5
6
7mainClass = Utils.classForName(childMainClass)
val app: SparkApplication = if (classOf[SparkApplication].isAssignableFrom(mainClass)) {
mainClass.getConstructor().newInstance().asInstanceOf[SparkApplication]
} else {
new JavaMainApplication(mainClass)
}
app.start(childArgs.toArray, sparkConf)Driver 首先创建 sparkContext 对象的创建
当 sparkContext 初始化之后,会等待 system 资源创建完成,调用 Hook 函数等待。
1
2
3
4
5
6
7// Post init
_taskScheduler.postStartHook()
// Invoked after system has successfully initialized (typically in spark context).
// Yarn uses this to bootstrap allocation of resources based on preferred locations,
// wait for executor registrations, etc.
def postStartHook(): Unit = { }创建完成之后,继续执行用户的代码,读写文件或者操作 rdd。

sparkcontext
前言
在Spark框架中,应用程序的提交离不开Spark Driver,而Spark Driver的初始化始终围绕SparkContext的初始化,可以说SparkContext是Spark程序的发动机引擎,有了它程序才能跑起来,在spark-core中,SparkContext重中之重,它提供了很多能力,比如生成RDD,比如生成广播变量等,所以学习SparkContext的组件和启动流程有助于剖析整个Spark内核的架构。
SparkContext组件概览
在SparkContext中包含了整个框架中很重要的几部分:
- SparkEnv:Spark的运行环境,Executor会依赖它去执行分配的task,不光Executor中有,同时为了保证本地模式任务也能跑起来,Driver中也有
- SparkUI:Spark作业的监控页面,底层并没有采用前端技术,纯后端实现,用以对当前SparkJob的监控和调优,可以从页面观察到目前的Executor的jvm信息,每个job的stage划分和task划分,同时还可以观察到每个task处理的数据,用以发现数据是否倾斜
- DAGScheduler:DAG调度器,是SparkJob调度系统的重要组件之一,负责创建job,根据RDD依赖情况划分stage,提交stage,将作业划分成一个有向无环图
- TaskScheduler:任务调度器,是SparkJob调度系统的重要组件之一,负责按照调度算法将DAGScheduler创建的task分发至Executor,DAGScheduler是它的前置调度
- SparkStatusTracker:提供对作业、Stage的监控
- ConsoleProcessBar:利用SparkStatusTracker提供监控信息,将任务进度以日志的形式打印到终端中
- HearbeatReceiver:心跳接收器,所有Executor都会定期向它发送心跳信息,用以统计存活的Executor,此信息会一直同步给TaskScheduler,用以保证TaskScheduler去分发task的时候会挑选合适的Executor
- ContextCleaner:上下文清理器,用异步的方式去清理那些超出应用作用域范围的RDD、ShuffleDependency和Broadcast
- LiveListenerBus:SparkContext中的事件总线,可以接收各个组件的事件,并且通过异步的方式对事件进行匹配并调用不同的回调方法
- ShutdownHookManager:关闭时的钩子管理器,用以做一些清理工作,比如资源释放等
- AppStatusStore:存储Application状态数据,在2.3.0之后的版本引入
- EventLoggingListener(可选):将事件持久化到存储的监听器,通过
spark.eventLog.enabled进行控制 - ExecutorAllocationManager(可选):Executor动态分配管理器,根据工作负载状态动态调整Executor的数量,通过属性
spark.dynamicAllocation.enabled和spark.dynamicAllocation.testing进行控制
任务调度
Action 触发 Job submit 到 DAGScheduler eventProcessLoop
使用 RDD 的 collect 方法可以出发 action,导致作业提交。
runJob with param
rddfuncpartitions
1 | def collect(): Array[T] = withScope { |
通过
dagScheduler进行作业提交1
dagScheduler.runJob(rdd, cleanedFunc, partitions, callSite, resultHandler, localProperties.get)
然后通过
submitJob将作业提交。并等待作业返回。submitJob将 Job 加入到 dagScheduler 的事件循环中,等待 Job 被调度。1
2
3
4
5private[spark] val eventProcessLoop = new DAGSchedulerEventProcessLoop(this)
eventProcessLoop.post(JobSubmitted(
jobId, rdd, func2, partitions.toArray, callSite, waiter,
Utils.cloneProperties(properties)))
DAGScheduler 对 Job 进行 Stage 划分,并且提交 Task 到 TaskScheduler
dagScheduler eventProcessLoop 通过 onReceive 方法处理事件。然后调用
dagScheduler.handleJobSubmitted来处理之前 Job 的提交。1
2
3
4
5
6
7
8
9
10
11
12
13
14
15
16
17
18
19/**
* The main event loop of the DAG scheduler.
*/
override def onReceive(event: DAGSchedulerEvent): Unit = {
val timerContext = timer.time()
try {
doOnReceive(event)
} finally {
timerContext.stop()
}
}
private def doOnReceive(event: DAGSchedulerEvent): Unit = event match {
case JobSubmitted(jobId, rdd, func, partitions, callSite, listener, properties) =>
dagScheduler.handleJobSubmitted(jobId, rdd, func, partitions, callSite, listener, properties)
case MapStageSubmitted(jobId, dependency, callSite, listener, properties) =>
dagScheduler.handleMapStageSubmitted(jobId, dependency, callSite, listener, properties)
}在
handleJobSubmitted中,会进行 stage 的划分,并且将所有的 stage 包括 parent stage and ancient stage 全部提交,通过 DFS 的方式1
2
3
4
5
6
7
8
9
10
11
12
13
14// 1. 调用创建 ResultStage 的方法
finalStage = createResultStage(finalRDD, func, partitions, jobId, callSite)
// 1.1 首先会获取 trigger action rdd 的所有 shuffleDeps,然后使用 shuffleDeps 创建当前 rdd 的所有 parent(不包括 parent 的 parent),最后创建 resultStage
// 获取 shuffleDeps 的方法就是 BFS
val (shuffleDeps, resourceProfiles) = getShuffleDependenciesAndResourceProfiles(rdd)
val parents = getOrCreateParentStages(shuffleDeps, jobId)
val stage = new ResultStage(id, rdd, func, partitions, parents, jobId,
callSite, resourceProfile.id)
// 2. 提交 stage,这里的 finalStage 就是 resultStage
submitStage(finalStage)getShuffleDependenciesAndResourceProfiles方法(BFS):1
2
3
4
5
6
7
8
9
10
11
12
13
14
15
16
17
18
19
20
21
22
23
24
25
26private[scheduler] def getShuffleDependenciesAndResourceProfiles(
rdd: RDD[_]): (HashSet[ShuffleDependency[_, _, _]], HashSet[ResourceProfile]) = {
// rdd 全部 parent 列表
val parents = new HashSet[ShuffleDependency[_, _, _]]
// 记忆化
val visited = new HashSet[RDD[_]]
// queue
val waitingForVisit = new ListBuffer[RDD[_]]
waitingForVisit += rdd
while (waitingForVisit.nonEmpty) {
val toVisit = waitingForVisit.remove(0)
if (!visited(toVisit)) {
visited += toVisit
Option(toVisit.getResourceProfile).foreach(resourceProfiles += _)
toVisit.dependencies.foreach {
// 如果是 shuffleDeps 将它加入 parent 中,stage 会从这个地方断开
case shuffleDep: ShuffleDependency[_, _, _] =>
parents += shuffleDep
// 如果是 narrowDeps,则将它加入 queue 进行 BFS
case dependency =>
waitingForVisit.prepend(dependency.rdd)
}
}
}
(parents, resourceProfiles)
}1
2
3
4
5
6
7
8
9
10
11
12
13
14
15
16
17
18
19
20
21
22
23
24
25
26
27
28
29
30
31
32
33
34
35
36
37
38
39
40
41
42
43
44
45
46
47
48
49
50
51
52
53
54
55
56
57
58
59
60
61
62
63
64
65
66/** Submits stage, but first recursively submits any missing parents. */
// 提交 resultStage 和 shuffleMapStage recursively 通过 submitStage
private def submitStage(stage: Stage): Unit = {
val jobId = activeJobForStage(stage)
if (jobId.isDefined) {
logDebug(s"submitStage($stage (name=${stage.name};" +
s"jobs=${stage.jobIds.toSeq.sorted.mkString(",")}))")
if (!waitingStages(stage) && !runningStages(stage) && !failedStages(stage)) {
val missing = getMissingParentStages(stage).sortBy(_.id)
logDebug("missing: " + missing)
if (missing.isEmpty) {
logInfo("Submitting " + stage + " (" + stage.rdd + "), which has no missing parents")
// 如果没有 missing 的 parent stage 就会提交当前阶段
submitMissingTasks(stage, jobId.get)
} else {
for (parent <- missing) {
// 不然先提交 parent stage
submitStage(parent)
}
// 最后将当前 stage 加入到 waitingStage 中
waitingStages += stage
}
}
} else {
abortStage(stage, "No active job for stage " + stage.id, None)
}
}
// submitMissingTasks 中会根据当前 stage 类型,然后通过 partition,rdd 创建对应的 Tasks。rdd 中有多少个分区就会创建多少个 Tasks
val tasks: Seq[Task[_]] = try {
val serializedTaskMetrics = closureSerializer.serialize(stage.latestInfo.taskMetrics).array()
stage match {
case stage: ShuffleMapStage =>
stage.pendingPartitions.clear()
partitionsToCompute.map { id =>
val locs = taskIdToLocations(id)
val part = partitions(id)
stage.pendingPartitions += id
new ShuffleMapTask(stage.id, stage.latestInfo.attemptNumber,
taskBinary, part, locs, properties, serializedTaskMetrics, Option(jobId),
Option(sc.applicationId), sc.applicationAttemptId, stage.rdd.isBarrier())
}
case stage: ResultStage =>
partitionsToCompute.map { id =>
val p: Int = stage.partitions(id)
val part = partitions(p)
val locs = taskIdToLocations(id)
new ResultTask(stage.id, stage.latestInfo.attemptNumber,
taskBinary, part, locs, id, properties, serializedTaskMetrics,
Option(jobId), Option(sc.applicationId), sc.applicationAttemptId,
stage.rdd.isBarrier())
}
}
} catch {
case NonFatal(e) =>
abortStage(stage, s"Task creation failed: $e\n${Utils.exceptionString(e)}", Some(e))
runningStages -= stage
return
}
// 最后在 taskScheduler 中提交 TaskSet
taskScheduler.submitTasks(new TaskSet(
tasks.toArray, stage.id, stage.latestInfo.attemptNumber, jobId, properties,
stage.resourceProfileId))
TaskScheduler 将 TaskSet 通过 backend 的调度分发到不同的 executor 上面
TaskScheduler 将 TaskSet 进一步包装成 TaskSetManager。然后提交到 schedulableBuilder 中。
1 | // 1. 通过 TaskSet 创建 TaskSetManager 对象 |
SchedulerBuilder 是 Spark 的任务调度器,提供两种调度方式:
- FIFOSchedulableBuilder
- FairSchedulableBuilder
1 | private[spark] trait SchedulableBuilder { |
之后 exector 使用一个 Thread 执行对应的 Task
1 | def launchTask(context: ExecutorBackend, taskDescription: TaskDescription): Unit = { |
shuffle
shuffle 一定会落盘
- 减少落盘数据量
预聚合:
map-side预聚合之后,每个节点本地就只会有一条相同的key,因为多条相同的key都被聚合起来了。其它节点在拉取所有节点上的相同key时,就会大大减少需要拉取的数据数量,从而也就减少了磁盘IO以及网络传输开销。
- reduceByKey和aggregateByKey算子都会使用用户自定义的函数对每个节点本地的相同key进行预聚合。
- groupByKey算子是不会进行预聚合的,全量的数据会在集群的各个节点之间分发和传输,性能相对来说比较差。
源码部分
DAGScheduler 中生成 task 的时候,会根据 stage 来生成不同的 task
1
2
3
4
5
6
7
8
9
10
11
12
13
14
15
16
17
18
19stage match {
case stage: ShuffleMapStage =>
stage.pendingPartitions.clear()
partitionsToCompute.map { id =>
// ShuffleMapStage => ShuffleMapTask
new ShuffleMapTask(stage.id, stage.latestInfo.attemptNumber,
taskBinary, part, locs, properties, serializedTaskMetrics, Option(jobId),
Option(sc.applicationId), sc.applicationAttemptId, stage.rdd.isBarrier())
}
case stage: ResultStage =>
partitionsToCompute.map { id =>
// ResultStage => ResultTask
new ResultTask(stage.id, stage.latestInfo.attemptNumber,
taskBinary, part, locs, id, properties, serializedTaskMetrics,
Option(jobId), Option(sc.applicationId), sc.applicationAttemptId,
stage.rdd.isBarrier())
}
}「map」ShuffleTask 在 runTask 的末尾会进行数据的落盘操作,不同的 shuffleWriterProcessor 会产生不同的文件。
1
2
3
4
5
6
7
8
9
10dep.shuffleWriterProcessor.write(rdd, dep, mapId, context, partition)
// 然后通过 shuffleHandle 通知写文件
writer = manager.getWriter[Any, Any](
dep.shuffleHandle,
mapId,
context,
createMetricsReporter(context))
writer.write(
rdd.iterator(partition, context).asInstanceOf[Iterator[_ <: Product2[Any, Any]]])「reduce」ResultTask 在 runTask 中读取 map 产生的文件
1
2
3
4
5
6
7
8
9
10
11
12
13
14
15
16
17
18
19
20
21
22
23
24
25
26
27
28// resultMapStage 的 runTask 方法
override def runTask(context: TaskContext): U = {
// Deserialize the RDD and the func using the broadcast variables.
val threadMXBean = ManagementFactory.getThreadMXBean
val deserializeStartTimeNs = System.nanoTime()
val deserializeStartCpuTime = if (threadMXBean.isCurrentThreadCpuTimeSupported) {
threadMXBean.getCurrentThreadCpuTime
} else 0L
val ser = SparkEnv.get.closureSerializer.newInstance()
val (rdd, func) = ser.deserialize[(RDD[T], (TaskContext, Iterator[T]) => U)](
ByteBuffer.wrap(taskBinary.value), Thread.currentThread.getContextClassLoader)
_executorDeserializeTimeNs = System.nanoTime() - deserializeStartTimeNs
_executorDeserializeCpuTime = if (threadMXBean.isCurrentThreadCpuTimeSupported) {
threadMXBean.getCurrentThreadCpuTime - deserializeStartCpuTime
} else 0L
func(context, rdd.iterator(partition, context))
}
// shuffleRDD iterator 的 comput 方法就会读取 map 产生的文件
override def compute(split: Partition, context: TaskContext): Iterator[(K, C)] = {
val dep = dependencies.head.asInstanceOf[ShuffleDependency[K, V, C]]
val metrics = context.taskMetrics().createTempShuffleReadMetrics()
SparkEnv.get.shuffleManager.getReader(
dep.shuffleHandle, split.index, split.index + 1, context, metrics)
.read()
.asInstanceOf[Iterator[(K, C)]]
}
- Post title:spark
- Post author:auggie
- Create time:2022-11-09 09:40:26
- Post link:https://ruanjiancheng.github.io/2022/11/09/spark/
- Copyright Notice:All articles in this blog are licensed under BY-NC-SA unless stating additionally.